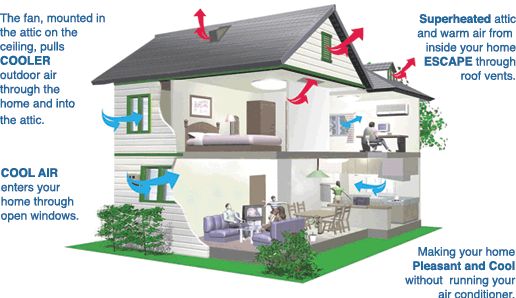
As the weather changes you might have occasions that the air inside your home is warmer than the air outside. You can harness that cooler air and bring it into your home by installing a whole-house fan. Ceiling fans are a great way to keep the air moving but not in all areas of your house. The kitchen and bathrooms are just two rooms that you don’t use ceiling fans, while you can use the exhaust fan to help eliminate the hot air from the bathroom that doesn’t fix the problem of bringing in the cooler air. The whole house fan is installed in the ceiling just below your attic, and it’s hidden by louvers so that it won’t look out of place.
Here’s how to install one yourself:
A whole-house fan is typically controlled by a variety of different methods; thermostats, wall switches or pull cords. They can usually be wired to work in conjunction with a power ventilator on the roof.
To determine which fan to buy, measure the square footage of your home. This will help you determine the correct fan to use based on the amount of footage your home is.
Here’s how to install a whole-house fan:
Materials and Tools:
- whole-house fan
- drill, with drill bits and driver bits
- wrenches
- hammer
- framing nails
- 2-by-4-inch studs
- drywall saw
- handsaw
- measuring tape
- framing square
- wire stripper
- wire nuts
- safety glasses
- work gloves
- long-sleeve shirt
- dust mask
Steps:
- To reduce the weight of the fan and make it less cumbersome, remove the blades before you begin installing it.
- Locate a central point where the ceiling is directly below the attic, on the uppermost ceiling. Make sure the fan fits by measuring the area first.
- Once in the attic, clean any debris, insulation or items from the location you plan to install the fan. Make sure the area is free of obstructions such as ductwork and plumbing. Secure or move any electrical wiring, and since you will be working around insulation wear long sleeves, work gloves, and a dust mask. This will eliminate you breathing in any dust or fiberglass insulation.
- Once in the installation space in the attic, measure the area the fan will sit. If your fan will span two ceiling joists, make reference marks on either side of the center joist and drill holes through the ceiling so you can make your final cuts from below.
- Back on the floor below, use the hole(s) you just drilled as a reference to measure and mark cutting lines on the ceiling. Use the inside dimensions of the louver flange to make your lines. Make sure the lines are square, then using a drywall saw or a reciprocating saw cut the lines carefully so as not to damage the rest of the ceiling. At this point in the project may need an assistant to help you hold the material in place to avoid it falling prematurely.Remove fasteners such as drywall nails or screws from any exposed joists.
- You now need to create a frame to support the fan by using 2-by-4-inch blocking between the joists around the cut area of the ceiling. This will serve the dual purpose of supporting the weight of the fan and providing support for the ceiling material. Once the frame isInstall brackets in the pre-drilled holes in the frame of your fan. Fasten the brackets tightly.
- Set the fan in place and mark the bracket holes. Remove the fan and drill pilot holes. Then set the fan back in place and secure it with bolts.
- When the fan is secure, reattach the fan blades. Spin the fan to make sure the blades turn freely.
- Make the electrical connections for the fan based on the manufacturer’s instructions. You may wish to hire a licensed electrician to make these connections.
- Secure the louver to the ceiling.