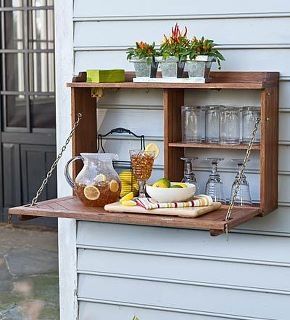
A fold-down bar or a Murphy bar is a bar area that folds away when not in use to save space and is perfect for small outdoor areas. This is an ideal solution for any small space inside your home or outside. When it’s folded, you can hide it with plants or furniture, and then those items can be moved when in use. The bar is built sturdy enough to hold dishes, serve food and drinks and will surprise and impress your guests. It is the perfect idea for outdoor parties. Let’s get started!
Tools and Materials
When you invest in a good wood for the tabletop and shelves think about using pine, maple, oak, cedar or even redwood. Cedar is an excellent choice because of the color of the wood.
- (6) 1×6 x 8’ planks for the tabletop and shelves
- (2) 1×2 x 6’ pieces for cabinet supports
- (2) 1×8 x 8’ pieces for cabinet frame
- (4) 1×10 x 8’ planks for cabinet back
- (4) 1×4 x 8’ planks for tabletop frame and legs
- (2) decorative gate hinges
- (2) flush cabinet hinges
- (2) gate latches
- pocket-hole jig with 1-1/4″ pocket-hole screws
- nail gun
- 1-1/4″ finishing nails
- 1-1/2” exterior-grade screws
- drill
- measuring tape
- hammer
- straight edge and a speed square
- level
- urethane
- exterior paint-and-primer-all-in-one
- paintbrush
- miter saw or circular saw
- metal straps for hanging cabinet
- (2) bar stools
Step 1: Frame
To build the frame for the cabinet you will need to cut and section out the following:
- 1×8 planks
- 42” planks for both side (vertical) pieces
- 28” and 29-1/2” planks for the top and bottom
Make sure the top board fits inside the side boards, 5 inches below the top of the two side pieces. Use the 5 inches to create the shelf on top of the unit. The bottom of the unit will be flush to the two sides. Once the boards are cut use the screws to attach the boards.
Step 2: Back Supports
The 1x2s are used to create the supports. Place 2 supports evenly apart on the inside of the box and 2 against the sides of your frame. Use the screws to secure the supports to the frame.
- Cut four 1x2s to 37”
Step 3: Attach the Back Frame
Use the 1x10s on the inside the frame placed over the 1x2s. They might be a bit tight so use a mallet to tap into place. Use the screws to secure.
- Cut four 1x10s to 28”
Step 4: Table Legs and Tabletop Frame
Use the 1x4s to create the tabletop frame with the horizontal pieces inset between the vertical pieces and should sit flush with the top of the legs. The bottom board should be 3” from the bottom of the vertical pieces to provide a nice finished look to the project. Use the pocket-hole jig to fasten the boards together.
- Cut the vertical pieces to 34-3/4” (adding the thickness of the tabletop, tabletop frame and hinges, the height of the table should be about 36”).
- Cut the horizontal leg pieces to 25-1/2”
- Cut the horizontal leg pieces to 38-1/2”
- Cut the horizontal leg pieces to 29-1/2”
To build the frame use the 29-1/2″ 1x4s for the top and bottom and the 38-1/2″ 1x4s for the sides. Use a 1-1/4” Kreg jig screw to hold them together for added stability.
Step 5: Shelves
When making the shelves they should fit snugly in the frame. Apply exterior-grade urethane to the tabletop and shelves and let dry. If you wanted to paint the project, paint the frame and legs first, let dry completely then apply the urethane. While the frame and legs are drying paint the shelves and tabletop then apply the urethane once the paint is completely dry. After everything is dry use the 1-1/4” nails and nail gun to secure to the frame.
- Cut the cabinet shelves to 10-5/8”
- Cut the center divider to 34-1/4″
Step 6: Attaching the Legs to Tabletop Support
After everything is pained, sealed and dry it is time to put it all together. Place the leg frame on top of the tabletop frame and carefully center it on all sides, avoid scratching the paint and sealer. Once this is done you are ready to attach the two cabinet hinges to the top of the legs with the other end of the hinges attached to the tabletop frame.
Step 7: Hanging Hardware, Hang Cabinet and Attaching Tabletop
Time to work smarter not harder! Line up where you want the cabinet to be placed and hang the cabinet first. After you have secured the cabinet attach the tabletop. Place the hanging hardware to the back of the cabinet making sure everything is level. Attach the tabletop to the cabinet using the decorative gate hinges. Place the hinges at the bottom of the 1×4 tabletop frame and connect them to the bottom of the cabinet. The tabletop can be used as a door for the cabinet when it’s folded up. Now attach the latch to secure the bar once it is folder up, you can use an eye hook latch or a slide-bolt latch if you live in an area that is subjected to high wind.