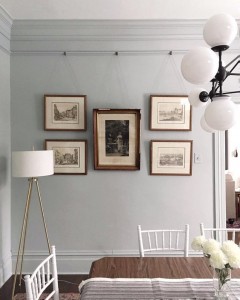
If you are trying to spruce up your home installing picture railings can give your home a elegant touch and it is budget friendly. This new way of hanging pictures is trending, fun and perfect for every room from the kitchen and bathroom to the hallways and foyer.
Materials and Tools:
- picture-rail molding
- handsaw with miter box or electric chop saw
- measuring tape
- nail gun and nails
- wood glue
- picture-rail hooks
- ribbon/wire/chain for hanging pictures
Steps:
- Determine where you want to position your picture rail on the wall. Traditionally, picture rail is hung 66 inches above the floor, but we’ve decided to install ours the same height of the door frames due to our expansive ceiling height.
- Measure the walls then miter cut the molding to length.
- Paint or stain the picture rail and let it dry completely.
- Use a laser level to make a straight line at your ideal height. This line will show you exactly where to hang your picture rail and will ensure that your rail is perfectly straight.
- Glue the back of the picture rail and then place the rail along the laser line. Use a nail gun to secure the rail into place.
- Attach hooks to the top of the railing to hang your artwork.
Tip: Keep artwork and frames a similar size for a symmetrical look. For a modern, sleek look, use clear fishing wire to hang artwork. Metal chain or wire will provide an industrial vibe while ribbon will give you a traditional look.