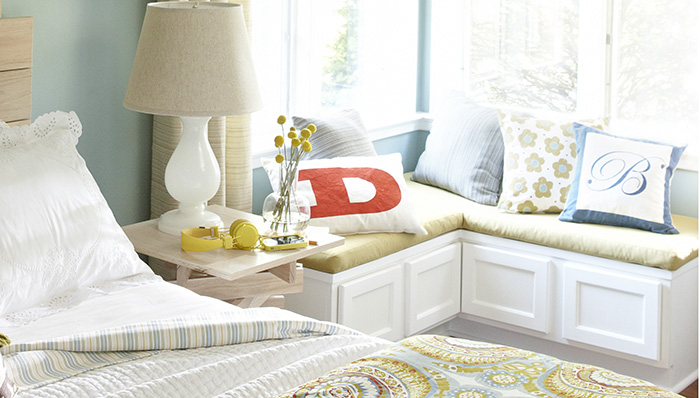
A window seat is a gorgeous place for anyone to sit and read, or just gaze out the window at a beautiful sunset. These typically have a reputation for being an expensive add-on, but with this easy tutorial, you can have your own custom window seat in no time!
Step 1: The Cabinets
- Measure desired window seat area.
- Purchase two (or more, depending on size) wall-unit stock cabinets (the kind you would install above a refrigerator) from a local home improvement store.
- If you can’t find the cabinets finished in the color you want, purchase them unfinished and stain or paint the exterior of the cabinets in the color of your choice.
Step 2: Prep the Area
- Remove shoe molding from around the wall where your window seat will go.
- Build a wooden frame from 2″ by 4″ lumber, you can also use 2” by 6” for added height. Make sure the frame is the same width as the window-seat area, but 2″ or 3″ less than the depth of the window seats. Include a center support in the frame for added stability.
- Lay the frame flat where your wall seats will go, and secure it to the wall with screws.
Step 3: Place the Cabinets
- Remove the doors from the cabinets (to make things easier) and clamp the cabinets together ensuring that they are flush on top and along the front.
- Using a drill bit narrower than the screws, drill pilot holes in the frame on the sides of each cabinet, and secure them with wood screws.
- Center the cabinets between the two side walls.
- Drill pilot holes through the bottom of the cabinets and into the base pedestal. Secure the cabinet to the base with screws. Remember that the base is recessed. Mark a line indicating the location of the base to help you screw directly into the wood.
Step 4: Attach the Filler Piece
- Measure the space between the wall and the cabinets. Measure at the top and just above the base molding on the wall.
- Transfer the measurements onto a filler piece (a piece of trim provided with the cabinet), and cut the piece to size. You may need to cut a notch in the filler piece to accommodate the base molding.
- Set the filler pieces in place, and fasten them to the sides of the cabinet with screws. Keep the top and bottom of the filler pieces flush with the cabinet.
Step 5: Attach the Toe Kick
- Measure the area for the toe kick. Cut a piece of trim to size, and secure it with small finish nails. Drive each nail until approximately 1/4″ of the head is above the surface. Use a nail set to drive the nails just below the surface.
Step 6: Attach Shelving and Trim
- Measure the length along the face of the cabinet. Transfer the measurements to a piece of shelving material, and cut it to size. Use shelving that matches the cabinets as closely as possible. Make sure the depth of the shelving is sufficient to cover or slightly overlap the front of the cabinets.
- Cut a piece of cabinet trim to the same length as the shelving material.
- Using the cabinets as a work surface, drill pilot holes through the edge trim and the edge of the shelving material. Secure the shelving and trim with small finish nails. Use a nail set as before, and use clamps to hold the tops of the boards flush.
Step 7: Attach Seat and Cabinet Doors
- Remove the boards from the top of the cabinets, and run a bead of panel adhesive along the cabinet edges. Press the seat into place.
- Replace the cabinet doors. Fill any nail holes with caulk or matching fill material. Caulk any voids along the wall, and use trim pieces to cover any gaps between the seat and the wall.
Optional: You could keep the doors off to create open storage; dab wood filler over the nail holes and sand lightly — you’ll never even know they were there. Paint the inside of the cabinets to match. Then, you can place baskets or storage containers in the open compartments to add stylish storage.